Transforming and Retouching >
Creating panoramic images using Photomerge > Using the Photomerge dialog box
|
Using the Photomerge dialog box
You use the Photomerge dialog box to edit a panoramic composition. This dialog box contains tools for manipulating the composition, a lightbox for storing source images that are not in use, a work area for assembling the composition, and options for viewing and editing the composition.
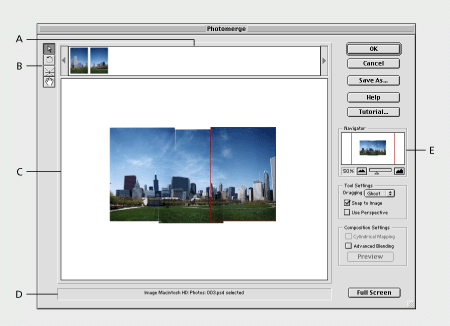
How source images appear in the Photomerge dialog box depends on how you set up the composition in the Photomerge Setup dialog box. If you selected Attempt to Automatically Arrange Source Files, Photoshop Elements attempts to assemble a composition for you in the work area. If Photoshop Elements can't determine how to place a source image, the image appears in the lightbox. If you deselected Attempt to Automatically Arrange Source Files, all source images appear in the lightbox, and you must manually assemble the composition by dragging each image from the lightbox to the work area.
Note: A tutorial is available for learning how to use the Photomerge command. Click the Tutorial button in the Photomerge dialog box.
To change your view of a composition:
Do one or more of the following:
Transforming and Retouching > Creating panoramic images using Photomerge > Using the Photomerge dialog box